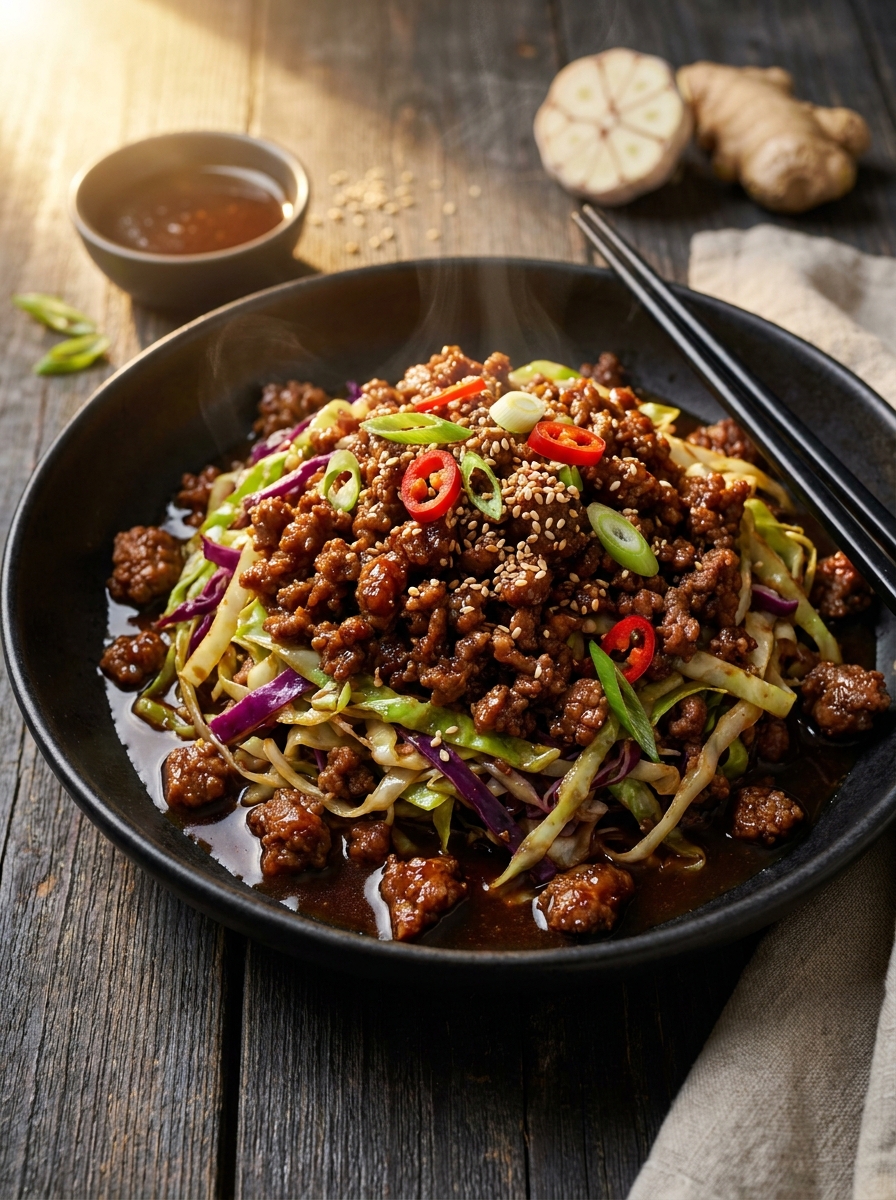
Some of the best meals you will ever make come together in under 30 minutes in a single pan — and this is absolutely one of them. Low Carb Mongolian Ground Beef and Cabbage takes all the bold, sticky, sweet and savoury flavours that make Mongolian beef one of the most ordered dishes at Chinese-American restaurants and brings them home in a version that is faster, cheaper, healthier, and honestly just as satisfying as anything you would get from a takeaway.
This dish is everything a weeknight dinner should be. It is quick to make, uses simple affordable ingredients, produces almost no washing up, and delivers a plate of food that is so full of flavour you will find yourself making it on repeat without ever getting bored of it. The ground beef soaks up the Mongolian sauce beautifully, the cabbage adds bulk, texture, and freshness, and the whole thing comes together in one pan in the time it would take you to even place a takeaway order.
And because this version skips the rice and the cornstarch coating on the beef that traditional Mongolian beef uses, it is significantly lower in carbohydrates without sacrificing a single thing in the flavour department. This is low carb cooking at its most satisfying and most practical.
What Is Mongolian Ground Beef And Cabbage?

Traditional Mongolian Beef is a Chinese-American dish made with thinly sliced flank steak that is coated in cornstarch, fried until crispy, and then tossed in a sticky, sweet and savoury sauce made from soy sauce, brown sugar, garlic, ginger, and sesame oil. It is rich, bold, and deeply flavourful — and it is also quite involved to make properly at home with the slicing, coating, and frying required.
This version simplifies the whole process by using ground beef instead of sliced steak. The ground beef cooks in minutes, absorbs the Mongolian sauce just as beautifully, and gives you all the same bold flavour in a fraction of the time and with a fraction of the effort. Cabbage replaces the rice as the bulk of the dish — it soaks up the sauce wonderfully, adds a pleasant crunch and freshness, and keeps the whole meal significantly lower in carbohydrates than the original.
The result is a dish that captures the spirit and the flavour of classic Mongolian beef while being faster, lighter, and entirely achievable on any weeknight without any special skills or equipment.
Ingredients You Will Need
For the Ground Beef and Cabbage:
- 500g (about 1 lb) ground beef (80/20 fat ratio recommended)
- 4 cups green cabbage, roughly chopped or shredded into thick strips
- 1 medium onion, thinly sliced
- 4 cloves garlic, minced
- 1 tablespoon fresh ginger, grated (or ½ teaspoon ground ginger)
- 2 green onions, sliced (for cooking and garnish)
- 1 tablespoon sesame oil
- 1 tablespoon vegetable oil
For the Mongolian Sauce:
- ⅓ cup soy sauce (use low sodium soy sauce if preferred)
- 2 tablespoons brown sugar or coconut sugar (reduce to 1 tablespoon for stricter low carb)
- 1 tablespoon oyster sauce
- 1 tablespoon rice vinegar or apple cider vinegar
- 1 teaspoon sriracha or chilli garlic sauce (optional for heat)
- ½ teaspoon black pepper
- ¼ cup water
- 1 teaspoon cornstarch or arrowroot powder (optional, thickens the sauce slightly)
For Garnish:
- Toasted sesame seeds
- Sliced green onions
- Fresh red chilli slices (optional)
- A drizzle of extra sesame oil
How to Make Low Carb Mongolian Ground Beef And Cabbage
Here are the right steps to follow in other to prepare this dish perfectly.
Step 1 — Make the Mongolian Sauce
Before anything goes on the heat, mix together the soy sauce, brown sugar, oyster sauce, rice vinegar, sriracha if using, black pepper, water, and cornstarch or arrowroot in a small bowl. Whisk until the sugar has dissolved and the cornstarch is fully mixed in with no lumps remaining. Set this aside and have it within reach because once the cooking starts, things move quickly and you will not have time to be measuring and mixing.
Tasting the sauce before you start cooking is a good habit with this recipe. It should be bold and intensely savoury with a clear sweetness and a slight tang. If you want it sweeter, add a little more sugar. If you want more depth, add a tiny extra splash of oyster sauce. Getting the sauce exactly how you want it before it hits the pan gives you full control over the final flavour of the dish.
Step 2 — Brown the Ground Beef
Heat the vegetable oil in a large wok or wide deep-sided pan over high heat. Once the oil is hot, add the ground beef and spread it out into a single layer across the bottom of the pan. Leave it alone for 2 to 3 minutes without stirring — allowing the beef to sit undisturbed on the hot surface is what creates the browned, slightly caramelised crust on the meat that adds a deep, savoury flavour that makes all the difference.
Once the bottom side is browned, break the meat up with a wooden spoon or spatula and stir it around, continuing to cook until the beef is completely browned all over and any excess moisture has evaporated from the pan. Draining off any excess fat at this point is a good idea — tip the pan slightly and spoon out the fat, or carefully transfer the beef to a plate lined with paper towels to drain briefly before returning it to the pan.
Properly browning the ground beef and ensuring all the moisture has evaporated before the sauce goes in is crucial. If there is excess moisture in the pan when you add the sauce, it will dilute the Mongolian sauce and you will end up with a watery, less flavourful result rather than the glossy, sticky sauce that coats everything beautifully.
Step 3 — Add the Aromatics
Push the browned beef to one side of the pan and add the sesame oil to the cleared space. Add the sliced onion and cook for about 2 minutes until it starts to soften. Add the minced garlic and grated ginger and stir them around in the oil for about 1 minute until they become wonderfully fragrant and the kitchen smells incredible.
Stir the onion, garlic, and ginger into the browned beef and mix everything together. The garlic and ginger are the aromatic backbone of Mongolian sauce — they bring warmth, depth, and that unmistakable flavour that makes this dish taste authentically bold and restaurant-quality. Do not rush this step and do not let the garlic burn — burnt garlic turns bitter and can ruin the flavour of the entire dish.
Step 4 — Add the Sauce
Pour the Mongolian sauce over the beef mixture and stir everything together. The sauce will bubble and start to reduce almost immediately on the high heat. Stir continuously for about 2 minutes while the sauce reduces and thickens slightly, coating every strand of the ground beef in that glossy, sticky, deeply flavourful glaze.
If you added cornstarch or arrowroot to the sauce, you will notice it thickening quite quickly — this is exactly what you want. If you prefer a thinner, more brothy sauce, skip the cornstarch entirely. Both versions are delicious — the thickened version clings more to the beef and cabbage while the thinner version creates more of a flavourful liquid that pools at the bottom of the bowl.
Let the sauce and beef mixture simmer together for 1 to 2 minutes so the beef fully absorbs the flavour before the cabbage goes in.
Step 5 — Add the Cabbage
Add the roughly chopped or shredded cabbage to the pan and toss everything together so the cabbage is mixed through the beef and sauce. Cook over high heat for about 3 to 4 minutes, tossing frequently, until the cabbage has wilted down significantly and is tender but still has a slight crunch to it.
The cabbage should not be cooked until it is completely soft and limp — you want it to retain enough texture to provide a contrast against the tender ground beef and the sticky sauce. That slight crunch is what makes the dish interesting to eat and prevents it from feeling one-dimensional in texture.
Stir in the sliced green onions in the last minute of cooking, reserving some for garnish. Taste the dish one final time before serving and adjust the seasoning if needed. A little extra soy sauce for saltiness, a touch more sugar for sweetness, or an extra splash of vinegar for brightness can all be added at this stage to fine-tune the final flavour.
Step 6 — Serve
Spoon the Mongolian ground beef and cabbage into bowls and garnish generously with toasted sesame seeds, sliced green onions, and fresh red chilli slices if you want extra heat. A final drizzle of sesame oil over the top adds another layer of nutty, aromatic flavour that finishes the dish beautifully.
This dish is complete and satisfying on its own as a low carb meal but it also works beautifully served over cauliflower rice, steamed broccoli rice, or a small portion of plain steamed rice if you are not strictly low carb and want something to soak up all that delicious sauce.
Helpful Cooking Tips

Use 80/20 ground beef for the best flavour. The fat content in 80/20 beef contributes enormously to the flavour and juiciness of the dish. Leaner beef like 90/10 or 93/7 produces a drier, less flavourful result. The excess fat is drained off after browning anyway so you get all the flavour benefit without keeping all the fat in the finished dish.
High heat is your friend in this recipe. Cooking on high heat is what gives you the browned, slightly caramelised beef, the quickly wilted cabbage with retained crunch, and the sticky reduced sauce. Cooking on medium or low heat produces a steamed, pale, watery result that is a completely different and far less satisfying dish.
Do not skip draining the excess fat. After browning the beef, draining the excess fat before adding the sauce prevents the Mongolian sauce from becoming greasy and ensures it reduces and clings to the beef properly rather than floating on top of a pool of rendered fat.
Chop the cabbage into larger pieces rather than fine shreds. Very finely shredded cabbage wilts down too much and too quickly and can become almost invisible in the finished dish. Larger, roughly chopped pieces hold their shape and texture better through the cooking process and give you something satisfying to bite into alongside the ground beef.
Have everything ready before you start. This dish cooks very quickly — from the moment the beef hits the pan to the moment you are spooning it into bowls is around 15 minutes. Have the sauce mixed, the cabbage chopped, the garlic and ginger prepared, and everything within reach before you turn on the heat. Scrambling to measure and chop while the pan is hot leads to burnt garlic and overcooked beef.
Variations You Can Try
- Add mushrooms — Sliced shiitake or cremini mushrooms added with the cabbage bring an earthy, meaty depth that pairs beautifully with the Mongolian sauce and adds another layer of texture to the dish. They also absorb the sauce wonderfully and become deeply savoury as they cook.
- Use ground turkey or ground chicken — Either works well as a leaner alternative to ground beef. The flavour will be milder so you may want to increase the garlic, ginger, and oyster sauce slightly to compensate. Both absorb the Mongolian sauce beautifully and produce a lighter version of the dish.
- Add bell peppers — Sliced red or yellow bell peppers added with the cabbage bring sweetness, colour, and a crisp texture that works beautifully in this dish. They also increase the vegetable content significantly without adding many carbohydrates.
- Make it spicier — Double the sriracha, add a tablespoon of chilli garlic paste, or toss in a teaspoon of dried chilli flakes with the sauce. The heat level in the base recipe is relatively mild so there is plenty of room to turn it up without losing balance.
- Add a fried egg on top — Place a fried egg with a runny yolk on top of each serving bowl. When you break the yolk and mix it through the beef and cabbage it adds a rich, creamy element that turns the dish into something that feels genuinely indulgent and special.
Storage Tips
Fridge: Store leftovers in an airtight container in the refrigerator for up to 4 days. This dish actually tastes even better the next day once the beef has had more time to absorb the flavour of the Mongolian sauce. The cabbage will soften slightly overnight but the flavour of the whole dish deepens and improves.
Freezer: The ground beef component freezes well but the cabbage becomes quite soft and watery after freezing and thawing. If you plan to freeze this dish, freeze the Mongolian ground beef without the cabbage and cook fresh cabbage to add when you reheat and serve. Freeze in a freezer-safe container for up to 3 months.
Reheating: Warm leftovers in a pan over medium heat for 3 to 4 minutes, stirring frequently, until heated through. Add a small splash of soy sauce or water to loosen the sauce if it has dried out while sitting in the fridge. You can also reheat in the microwave in a covered bowl in short bursts, stirring between each one to ensure even heating.
Meal prep: This recipe is excellent for meal prep. Make a full batch at the beginning of the week and divide it into individual portions. It reheats quickly and well which makes it a brilliant option for fast, flavourful lunches or dinners throughout the week.
Frequently Asked Questions
Is this dish actually low carb? Yes. By replacing the rice with cabbage and skipping the cornstarch coating on the beef that traditional Mongolian beef uses, this dish is significantly lower in carbohydrates than the restaurant version. The main sources of carbohydrates in this recipe are the small amount of brown sugar in the sauce and the oyster sauce. You can reduce the brown sugar to one tablespoon or replace it with a sugar-free sweetener like erythritol or monk fruit sweetener to make it even lower carb without any noticeable difference in flavour.
What can I use instead of oyster sauce? Oyster sauce adds a deep, slightly sweet, intensely savoury flavour to the Mongolian sauce that is quite distinctive. If you cannot find it or want to avoid shellfish, hoisin sauce is the closest substitute — it is thicker and sweeter but gives a similar depth of flavour. You can also use an extra tablespoon of soy sauce with a teaspoon of brown sugar mixed in as a simpler substitute, though the flavour will be slightly less complex.
Can I use red cabbage instead of green cabbage? Yes. Red cabbage has a slightly more robust, peppery flavour than green cabbage and holds its texture even better when cooked. It will turn the dish a dark purple-red colour which looks dramatic and striking in the bowl. The flavour works very well with the Mongolian sauce so feel free to use it if that is what you have available.
How do I make this dish gluten-free? Replace the regular soy sauce with tamari or a certified gluten-free soy sauce. Check the label on your oyster sauce as some brands contain wheat — there are gluten-free oyster sauce options available in most Asian grocery stores and larger supermarkets. The rest of the ingredients in this recipe are naturally gluten-free so those two swaps are all you need.
Can I add noodles to this recipe if I am not following a low carb diet? Absolutely. Rice noodles or glass noodles cooked according to the pack instructions and tossed through the beef and cabbage in the final minute of cooking work incredibly well. The noodles soak up the Mongolian sauce and turn the dish into something that is even more filling and substantial. You can also serve it over plain steamed rice or fried rice if you prefer something more traditional.
Conclusion
Low Carb Mongolian Ground Beef and Cabbage is the kind of recipe that quietly becomes one of the most made dishes in your weekly cooking rotation. It is fast, it is satisfying, it is packed with the kind of bold, restaurant-quality flavour that makes you genuinely look forward to dinner, and it proves convincingly that eating lower carb does not mean eating food that is boring, bland, or in any way a lesser version of what you actually want to eat.
The sticky, sweet, and savoury Mongolian sauce on tender browned ground beef, the satisfying crunch of the wilted cabbage, and the fragrance of the garlic, ginger, and sesame oil all come together in one pan to create a meal that is greater than the sum of its parts and better than most people expect a 20-minute dinner to be.
Make it once and it earns its place permanently. Make it regularly and it becomes one of those reliable, comforting, utterly delicious meals that you know you can always count on to deliver — no matter how busy the week has been or how little time you have to get dinner on the table.